
Written by Jan Prihoda, an active Zowe community member and a product owner at Broadcom
z/OSMF workflows are not new on the mainframe landscape. However, their adoption by the community is not as widespread as they deserve. Let me show you what z/OSMF workflows can do for you when installing The Open Mainframe Project’s Zowe z/OS components for the first time.
Zowe Workflows
In my previous blog, I focused on the description of the PSWI (Portable Software Instance) that Open Mainframe Project’s Zowe recently released. Today, I would like to talk about the z/OSMF workflow that can be used to install and configure Zowe on z/OS. Zowe has two types of z/OSMF workflows:
- Used when performing PSWI deployment itself.
- Built for setup of certificates.
In the future, you’ll probably be seeing more workflows for other configuration tasks. If you’ve got an idea for a workflow, there are several ways you can help to get it implemented.
- You can leave a comment on Medium.
- You can interact with the community directly using Open Mainframe Project Slack.
- You can even help design and build the workflow. If that appeals to you, maybe you’ll consider joining a regular Zowe squad meeting to contribute.
In this blog, I would like to walk you through the existing z/OSMF workflow for Zowe z/OS components configuration.
The configuration workflow is intended to be used when you perform a fresh deployment of the Zowe PSWI. You can learn how to use a PSWI from a nice video tutorial made by IBM here and in the context of Zowe in my previous article here (workflows are discussed in the paragraph Perform workflows).
Zowe 2.0 Configuration Workflow
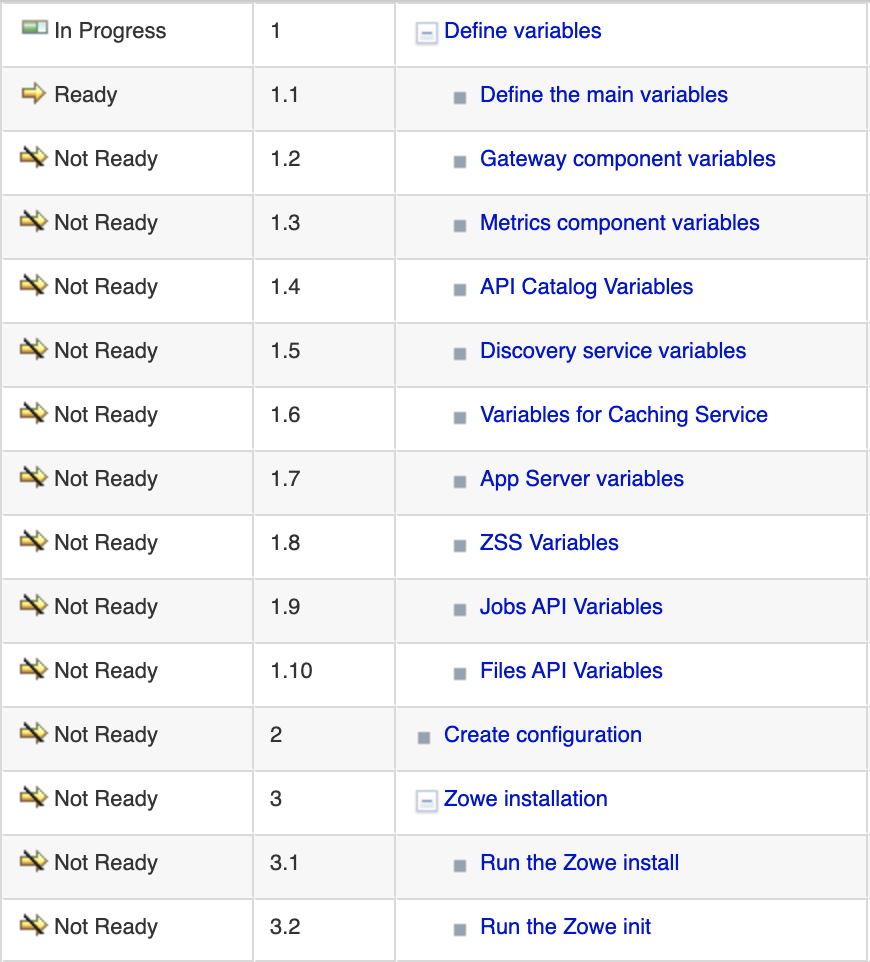
Let’s assume you are close to the successful deployment of the Zowe PSWI and now you are about to start the Zowe 2.0 configuration workflow. When you open the workflow from the list of workflows in the PSWI, you should see a screen like the one shown below. Here you can see workflow details and available steps. There are 3 main steps. Steps 1 and 3 each have child steps. In step 1, the only mandatory child step is to define the main variables. Depending on your answers, the remaining steps may be enabled or disabled. Steps 2 and 3 are mandatory.

First Workflow Step — Gathering Configuration Variable Values
The first step is intended as a general configuration variables form. There you fill in all variables that are required (marked by a red asterisk). Some of them are pre-populated by their default values, and some of them are empty. To be able to continue to the next step (the Next> button), you need to fill in all required ones. The following pages are for java, nodejs, and z/OSMF variables. Many of these fields support a basic validation, like a proper path structure, dataset name conventions, or numeric size. However please note that the workflow does not check on the fly whether a target dataset exists, or a directory has enough space, for example.

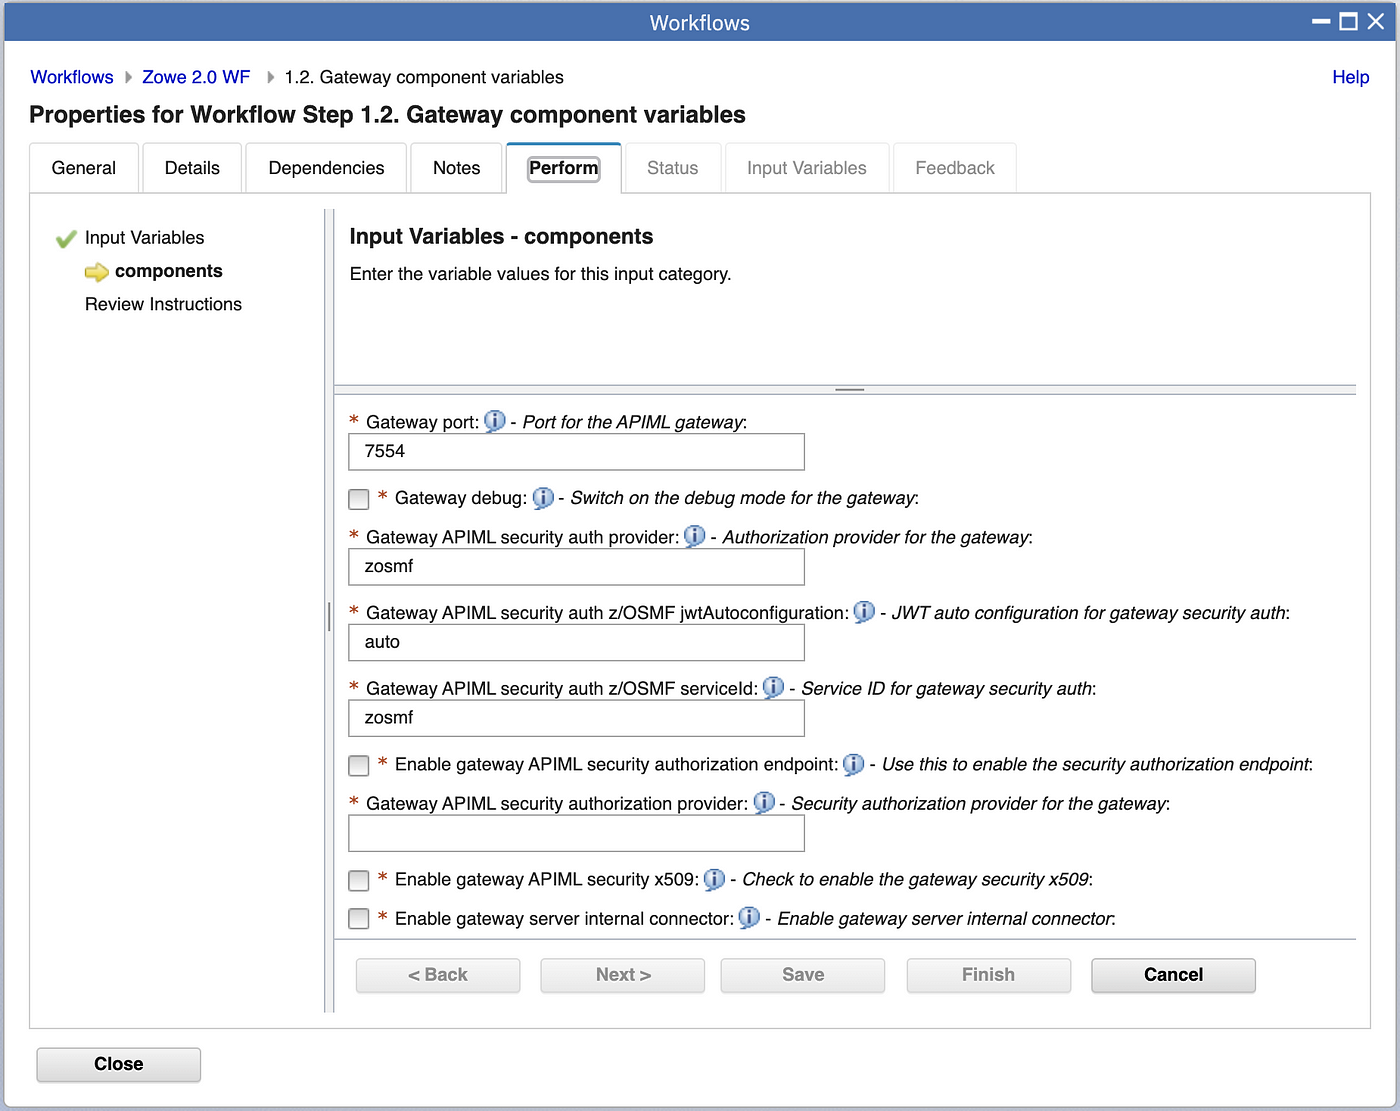
The last list of variables gathered in the components section controls which components should be enabled and thus configured. An example can be seen in the next screenshot.

When you are done with all variables, click Finish and the first step should be marked with a green check and in the Complete state. Note, that substeps that are related to the components selected in the previous step are in the Ready state, the rest in the Skipped state.

Click on the first ready step and follow the screen flow in the same way as you did previously. An example of the Gateway component is presented in the next picture.
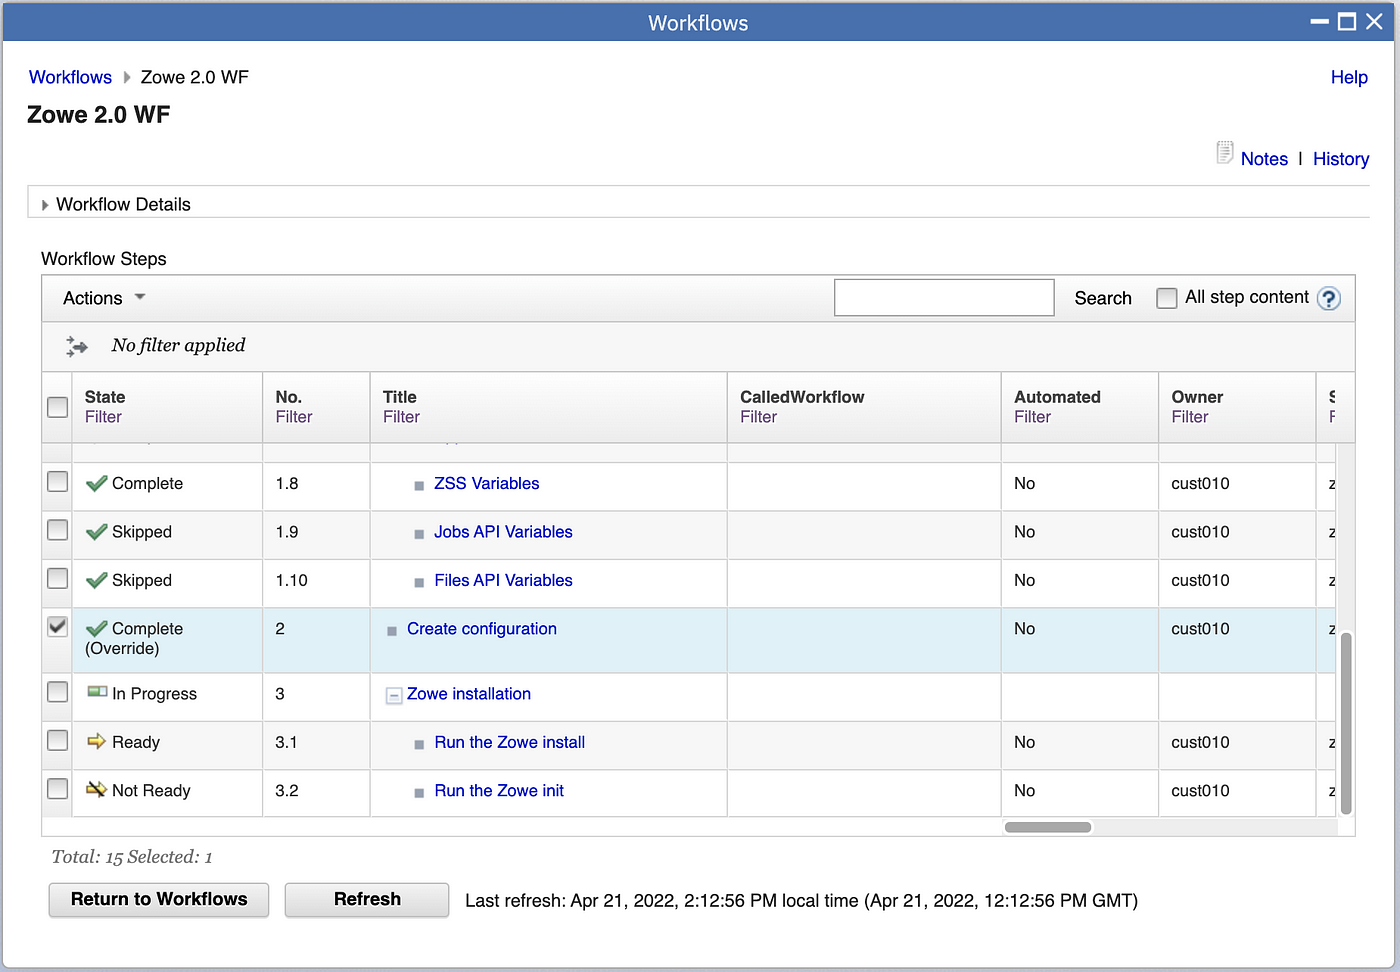
In the same way, you need to configure all components using all steps in the Ready state belonging to the first parent step. When done, the parent step should be in the Complete state and the rest either in the Skipped or Complete state too.

The Second Step — Generating Zowe Configuration File
This step has no child steps and is really simple. It just creates a configuration file for Zowe based on all the variable values you previously filled in. You can review and if needed, make changes in the JCL (It should not be needed, but I just want to emphasize that you have still full control over your changes on the system).

When done, you should have your Zowe instance configuration file ready and z/OSMF should mark the second step as Complete.
The Third Step — Zowe Install And Init
This step consumes in two phases the config file you created in the previous step.
Both steps are very simple and you don’t need to fill in any variables, however, if you wish you may review the JCL. Here I would like to point out that the workflow strictly follows the new Zowe v2 install and configuration schema. So it generates the zowe.yaml file and runs the new Zowe zwe CLI tool.
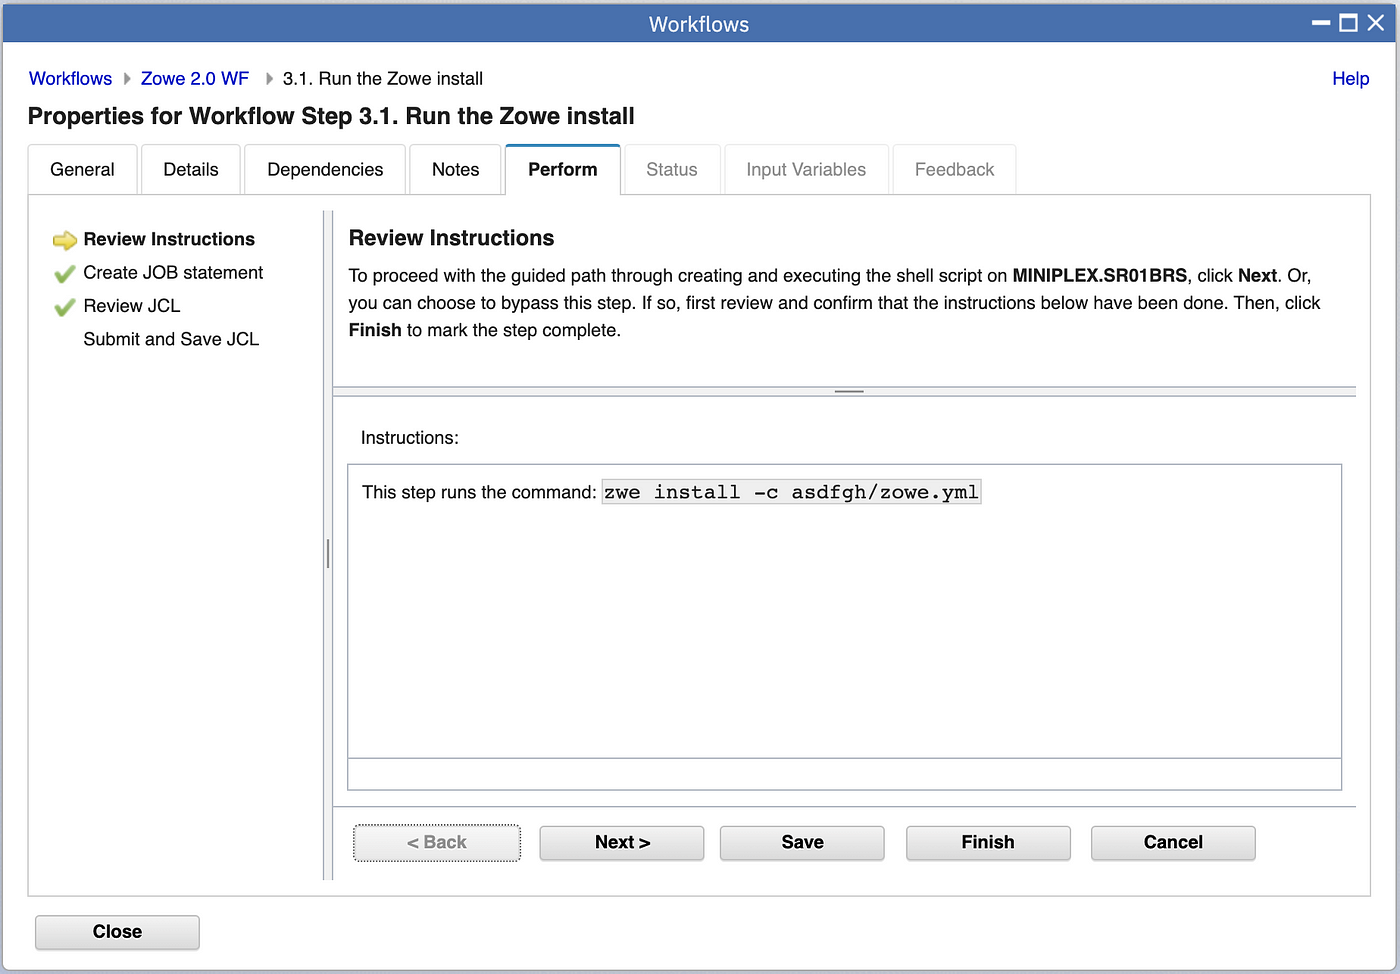
Use the last child steps to execute zwe init command.
And that is it

Congratulations! You have successfully completed the Zowe Configuration workflow and you can return to the Deployment checklist for the Zowe PSWI. When done there, you are ready to start your Zowe instance and connect to the services you just enabled and configured.
Learn More
If you enjoyed this blog check out more Zowe blogs here. Or, ask a question and join the conversation on the Open Mainframe Project Slack Channel #Zowe-dev, #Zowe-user or #Zowe-onboarding. If this is your first time using the Open Mainframe slack channel, register here.
If you’d like to learn more about Zowe – we’ve got two upcoming events that will features lots of Zowe content:
- SHARE, Columbus, Ohio + Virtual – August 21-26 – register here.
- Open Mainframe Summit, Philadelphia, PA + Virtual – September 21-22 – register here.